
Introduction
We are releasing a public registry of Docker images for SWE-bench, to help the community run more efficient and reproducible SWE-bench evaluations. By making better use of layer caching, we reduced the total size of the registry to 67 GiB for all 2290 SWE-bench images (10x reduction), and to 30 GiB for 500 SWE-bench Verified images (6x reduction). This allows us to run SWE-bench Verified in 62 minutes on a single GitHub actions VM with 32 cores and 128GB of RAM.
We’re hiring an experienced engineer to lead our benchmarking efforts and be my new manager. Details at the bottom of the post.
Background
SWE-bench is a benchmark designed to evaluate large language models on real-world software engineering tasks. It consists of 2,294 GitHub issues from 12 popular Python repositories, paired with the actual pull requests that resolved those issues.
For each task, the AI system is given access to the repo in its state immediately before the pull request was merged, along with the issue description. The AI system must then modify the codebase to fix the problem. Success is measured by whether the AI system’s solution passes the test suite from after the pull request was merged—meaning the AI system must produce changes that satisfy the same tests that validated the human developer’s solution.
SWE-bench Verified is a human-validated subset of 500 problems from the original benchmark. (For a detailed analysis of what SWE-bench Verified measures and how to interpret its results, see our deep dive into the benchmark.)
SWE-bench has traditionally been considered a challenging benchmark to run. For example, the All Hands team reports that it originally took them “several days” to run SWE-bench lite (300 examples), or over 10 minutes per sample. By using 32 machines in parallel, they reduced this to “several hours”.
SWE-bench and Docker
During SWE-bench evaluation, the AI system directly modifies a codebase in a sandbox with the necessary dependencies. Each question requires its own sandbox environment to capture the exact state of the repo immediately before the PR was merged, and these environments are specified using Docker images. The SWE-bench repo contains scripts that generate Dockerfiles and their context from the SWE-bench dataset, but without an image registry that stores the actual images, these images must be built from source.
There are two problems with building from source:
Speed: Building the images takes a long time. When operating on a development machine, you only need to build them once, after which they are cached. However, to run rigorously auditable evaluations at scale, like we do for our Benchmarking Hub, it’s necessary to use cloud-based VMs that are ephemeral. In this case, every evaluation run would require building all the images again.
Reproducibility: The build process relies on external resources (like apt or PyPI packages), so images built at different times may not be identical, even if the Dockerfiles and local context are the same. In particular, if the Dockerfiles do not pin versions for dependencies (which SWE-bench Dockerfiles generally do not, see below), the image will depend on the dependency resolution at build time. In addition, if a version of some dependency becomes unavailable, or moves to another address, etc., the build will fail. This may become an increasing problem over time, as many of the SWE-bench issues are now quite old (e.g. from 2015).
Therefore, our first contribution is a public registry of Docker images for SWE-bench, containing 2290 images for the x86_64 architecture (we were unable to build 4 out of 2294 images). This registry is free for anyone to use.
In addition, we optimized the images so that the total size of the registry is reduced by 6-10x. The rest of this post describes these optimizations.
Docker layering
The 2294 issues are from 12 repos, so many issues share the same repo. In fact, the distribution is heavily skewed, with Django accounting for 850/2294, or 37% of the issues.
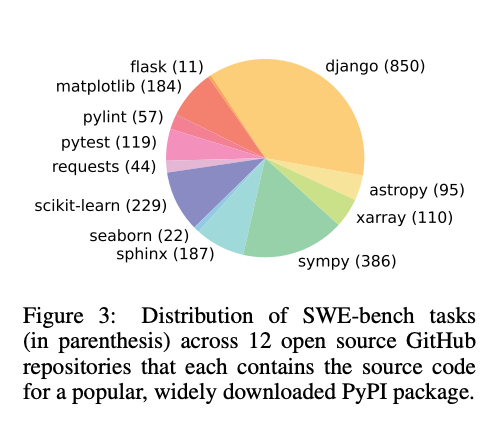
Distribution of SWE-bench issues by repository, showing Django accounts for 850 out of 2294 total issues.
In addition, many issues will be close to each other in time, so the codebase will likely be similar. Two Django issues a week apart, for example, will have very similar dependencies. The main difference between them will be the change in application code between the two issues (usually a small fraction of the total codebase).
This is a perfect use case for Docker’s layer caching. What follows is a slightly simplified 1-paragraph explanation of layer caching. Each RUN, COPY, or ADD instruction in a Dockerfile creates a layer. A layer represents a specific modification to the container’s file system. Layers are added from bottom to top. Each layer is cached: if I change a layer, only layers above (that depend on it) will be rebuilt. In other words, if I make a change to a Dockerfile instruction and rebuild, this line and subsequent lines in the Dockerfile will have their layers re-built. Previous lines do not need to run again.1
The SWE-bench Dockerfiles, created by Princeton researchers and OpenAI staff, do not make good use of layer caching and leave much low-hanging fruit for optimisation.
I will highlight just a few of the optimisations I made. To skip directly to overall results on size and runtime, click here. If you are interested in the full list of optimisations, it’s in the commit history of this repo.
Anatomy of a SWE-bench Dockerfile
Let’s take a closer look at a typical Django instance, django__django-13371.2
All SWE-bench images are built in three stages, base, env, and instance. Many instance images depend on a single env image. For example, the 850 Django images rely on 12 env images.
The Dockerfiles are all virtually identical and outsource the actual work to a setup_env.sh and setup_repo.sh script.
Here is the base Dockerfile:
# Base (ghcr.io/epoch-research/sweb-c7d4d9d4.base.x86_64)
FROM --platform=linux/x86_64 ubuntu:22.04

## ... long apt install command omitted ...

# Download and install conda
RUN wget 'https://repo.anaconda.com/miniconda/Miniconda3-py311_23.11.0-2-Linux-x86_64.sh' -O miniconda.sh \
    && bash miniconda.sh -b -p /opt/miniconda3
# Add conda to PATH
ENV PATH=/opt/miniconda3/bin:$PATH
# Add conda to shell startup scripts like .bashrc (DO NOT REMOVE THIS)
RUN conda init --all
RUN conda config --append channels conda-forge

RUN adduser --disabled-password --gecos 'dog' nonroot
And here is the env Dockerfile:
# env (ghcr.io/epoch-research/sweb-c7d4d9d4.env.x86_64.e83e37f52c09532c62acfb)
FROM --platform=linux/x86_64 ghcr.io/epoch-research/sweb-c7d4d9d4.base.x86_64:latest

COPY ./setup_env.sh /root/
RUN chmod +x /root/setup_env.sh
RUN /bin/bash -c "source ~/.bashrc && /root/setup_env.sh"

WORKDIR /testbed/

# Automatically activate the testbed environment
RUN echo "source /opt/miniconda3/etc/profile.d/conda.sh && conda activate testbed" > /root/.bashrc
Finally, here is the instance Dockerfile:
# instance (ghcr.io/epoch-research/sweb-c7d4d9d4.eval.x86_64.django__django-13371)
FROM --platform=linux/x86_64 ghcr.io/epoch-research/sweb-c7d4d9d4.env.x86_64.e83e37f52c09532c62acfb:latest

COPY ./setup_repo.sh /root/
RUN /bin/bash /root/setup_repo.sh

WORKDIR /testbed/
Side note: although we are here calling env and instance different ‘stages’, this is different from a genuine multi-stage build. For more detail, look at this footnote3.
Let’s look at the setup_env.sh and setup_repo.sh scripts for the Django 13371 instance.
This is the setup_env.sh script:
# setup_env.sh for `env` image e83e37f52c09532c62acfb
# (used by Django 13371)
set -euxo pipefail
source /opt/miniconda3/bin/activate
conda create -n testbed python=3.6 -y
cat <<'EOF_59812759871' > $HOME/requirements.txt
asgiref >= 3.3.2
argon2-cffi >= 16.1.0
...long list of dependencies truncated...
colorama; sys.platform == 'win32'
EOF_59812759871


conda activate testbed && python -m pip install -r $HOME/requirements.txt
rm $HOME/requirements.txt
conda activate testbed
And this is the setup_repo.sh script:
# setup_repo.sh for django__django-13371
set -euxo pipefail
git clone -o origin https://github.com/django/django /testbed
chmod -R 777 /testbed
cd /testbed
git reset --hard 3a9f192b131f7a9b0fe5783c684b23015fa67cc8
git remote remove origin
source /opt/miniconda3/bin/activate
conda activate testbed
echo "Current environment: $CONDA_DEFAULT_ENV"
python -m pip install -e .
There are numerous things to comment on here, but how do we find the most important optimisations to reduce the overall size of the images required to run SWE-bench?
We can use the fantastic tool dive (github.com/wagoodman/dive), which lets us see the layers of an image and their size. We can also see what actually changed on the filesystem in each layer with the file tree view on the right-hand side.
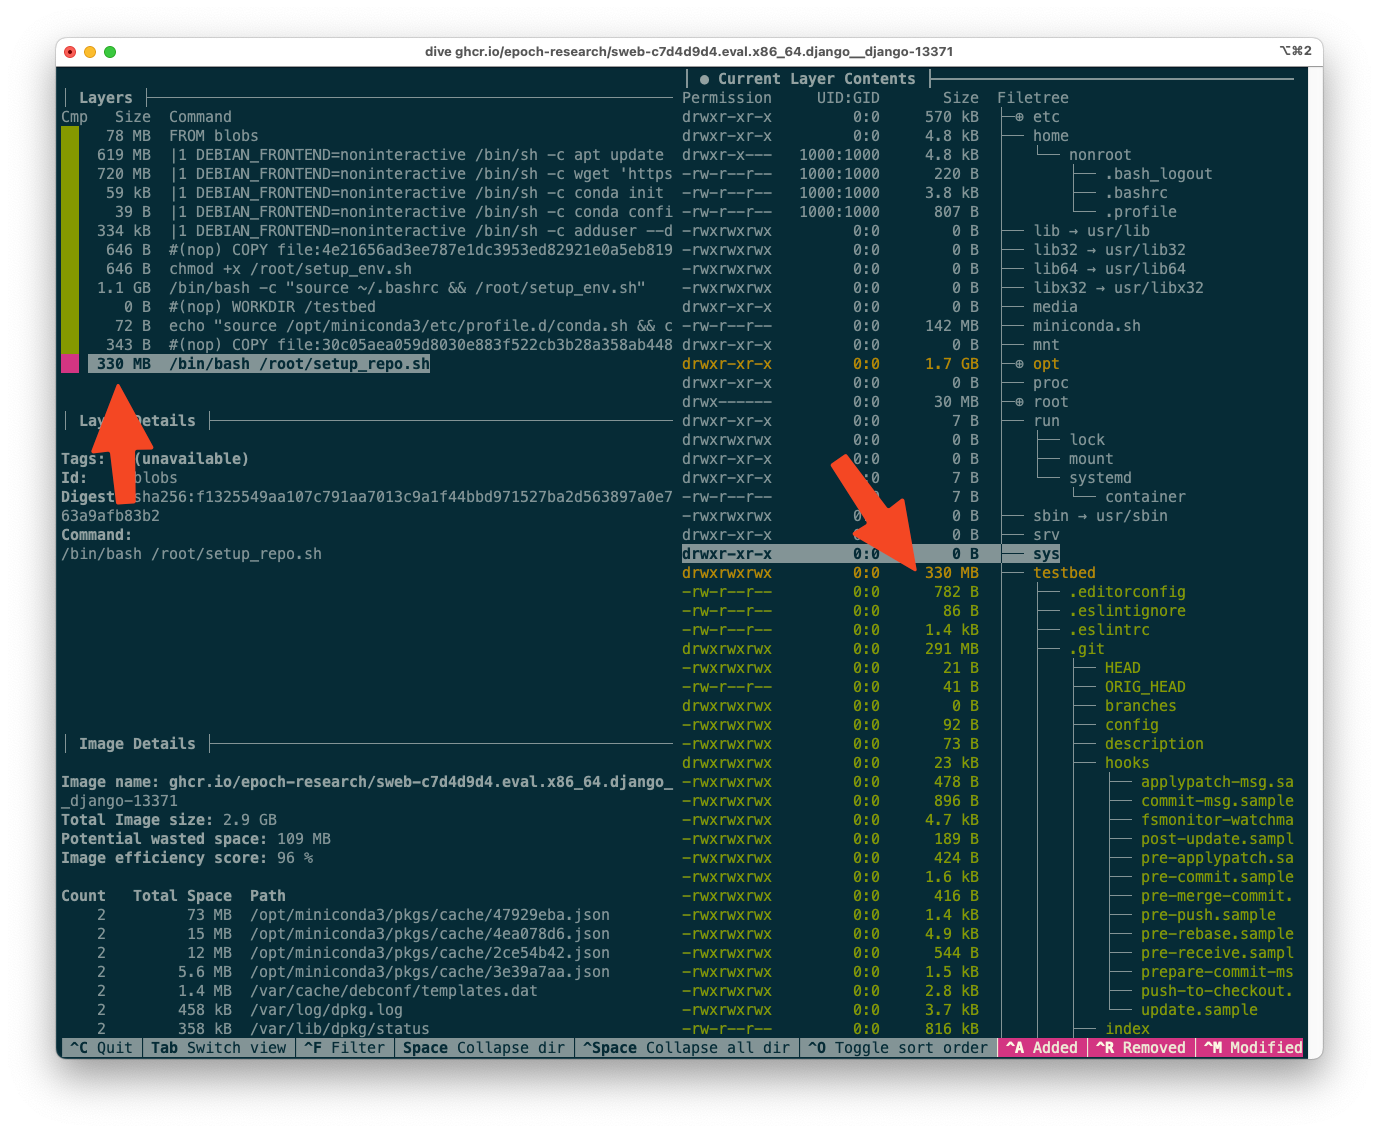
For example, here is the dive output for the Django 13371 image, focusing on the layer created by setup_env.sh:
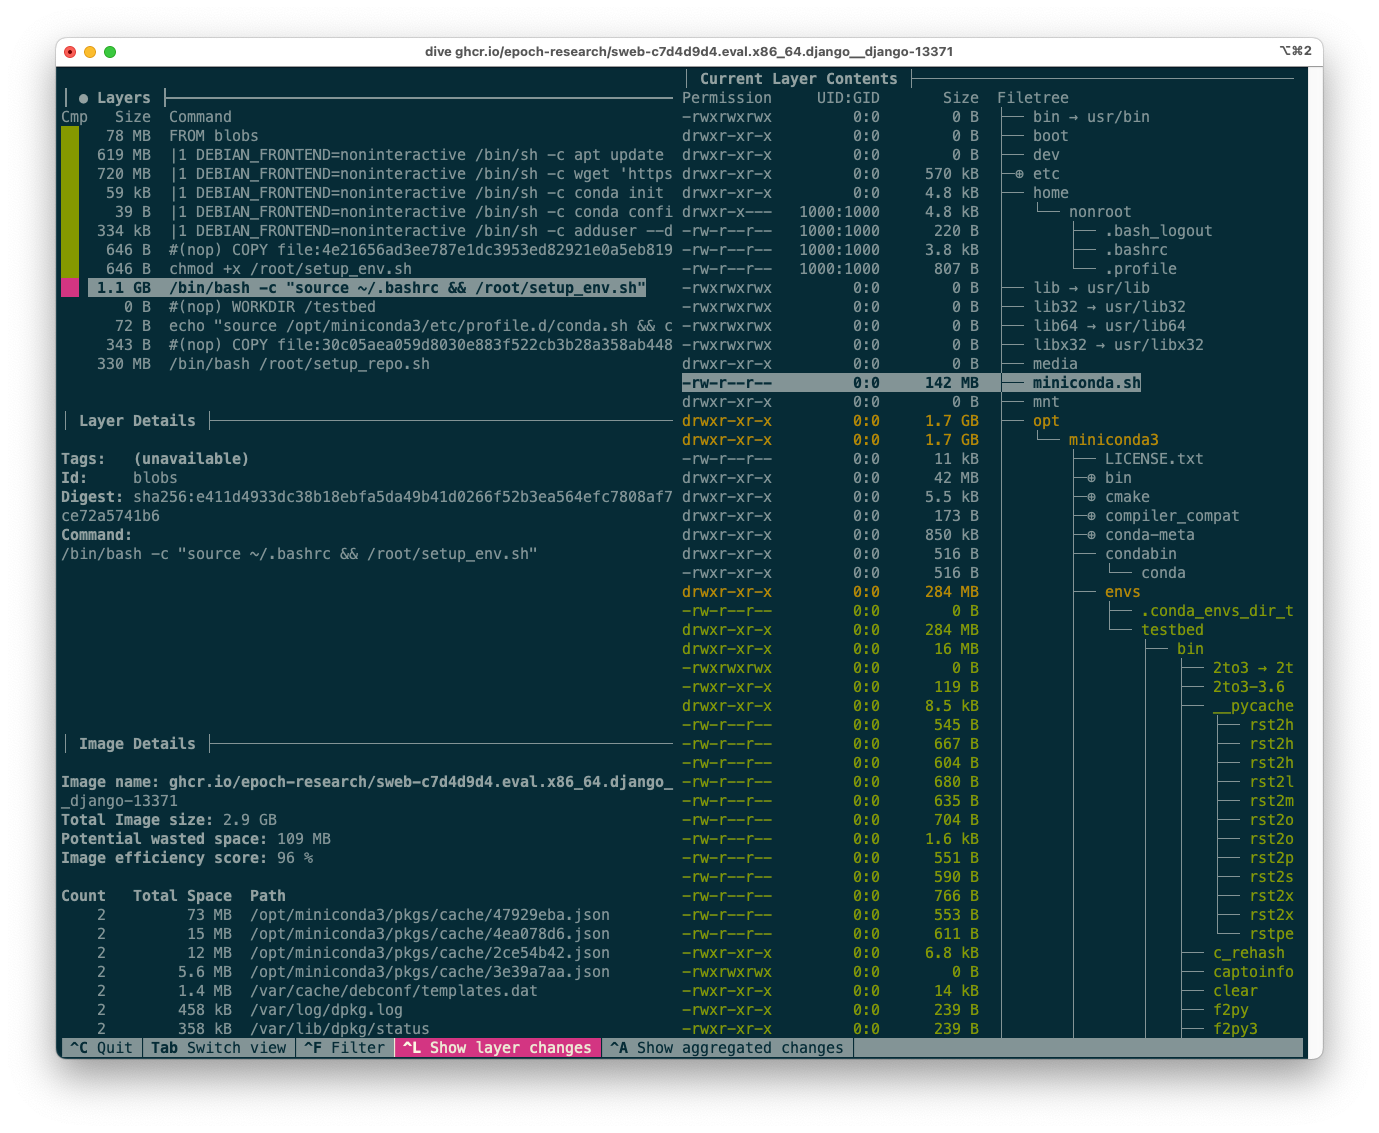
The dive tool output for the Django 13371 image.
In the next section, I’ll explain how to interpret this output to suggest optimisations.
Moving the git clone operation
One salient feature of the output above can be seen from the layer sizes (top-left corner) alone: the topmost layer, corresponding to setup_repo.sh, is 330MB. Optimizations to this layer are tens of times more impactful than optimizations to the setup_env.sh layer, because the setup_repo.sh layer is different for each instance. (The ratio should be roughly 12:850 for the full SWE-bench, which is 70x, and still well over 10x for SWE-bench Verified)
setup_repo.sh does two major things in terms of disk space:
- Cloning the Django repo with its full git history (
git clone -o origin https://github.com/django/django /testbed) - Installing any additional dependencies required by this specific revision, that were not already present in the
envimage (python -m pip install -e .)
Which of these is more important? By looking at the layer contents, we can see that, in this case, very few other dependencies were needed, and cloning the repo took up virtually all the 330MB.
The dive output for the Django 13371 image, focused on the final (topmost) layer.
This represents an opportunity for optimization. We can move the git clone operation to the env image, so that it is shared across many Django instances. setup_repo.sh will only need to git reset --hard to the correct commit. This optimization is especially strong because the git history itself, stored in .git, represents 291MB of the 330MB layer size.
The new final layer is 40MB:
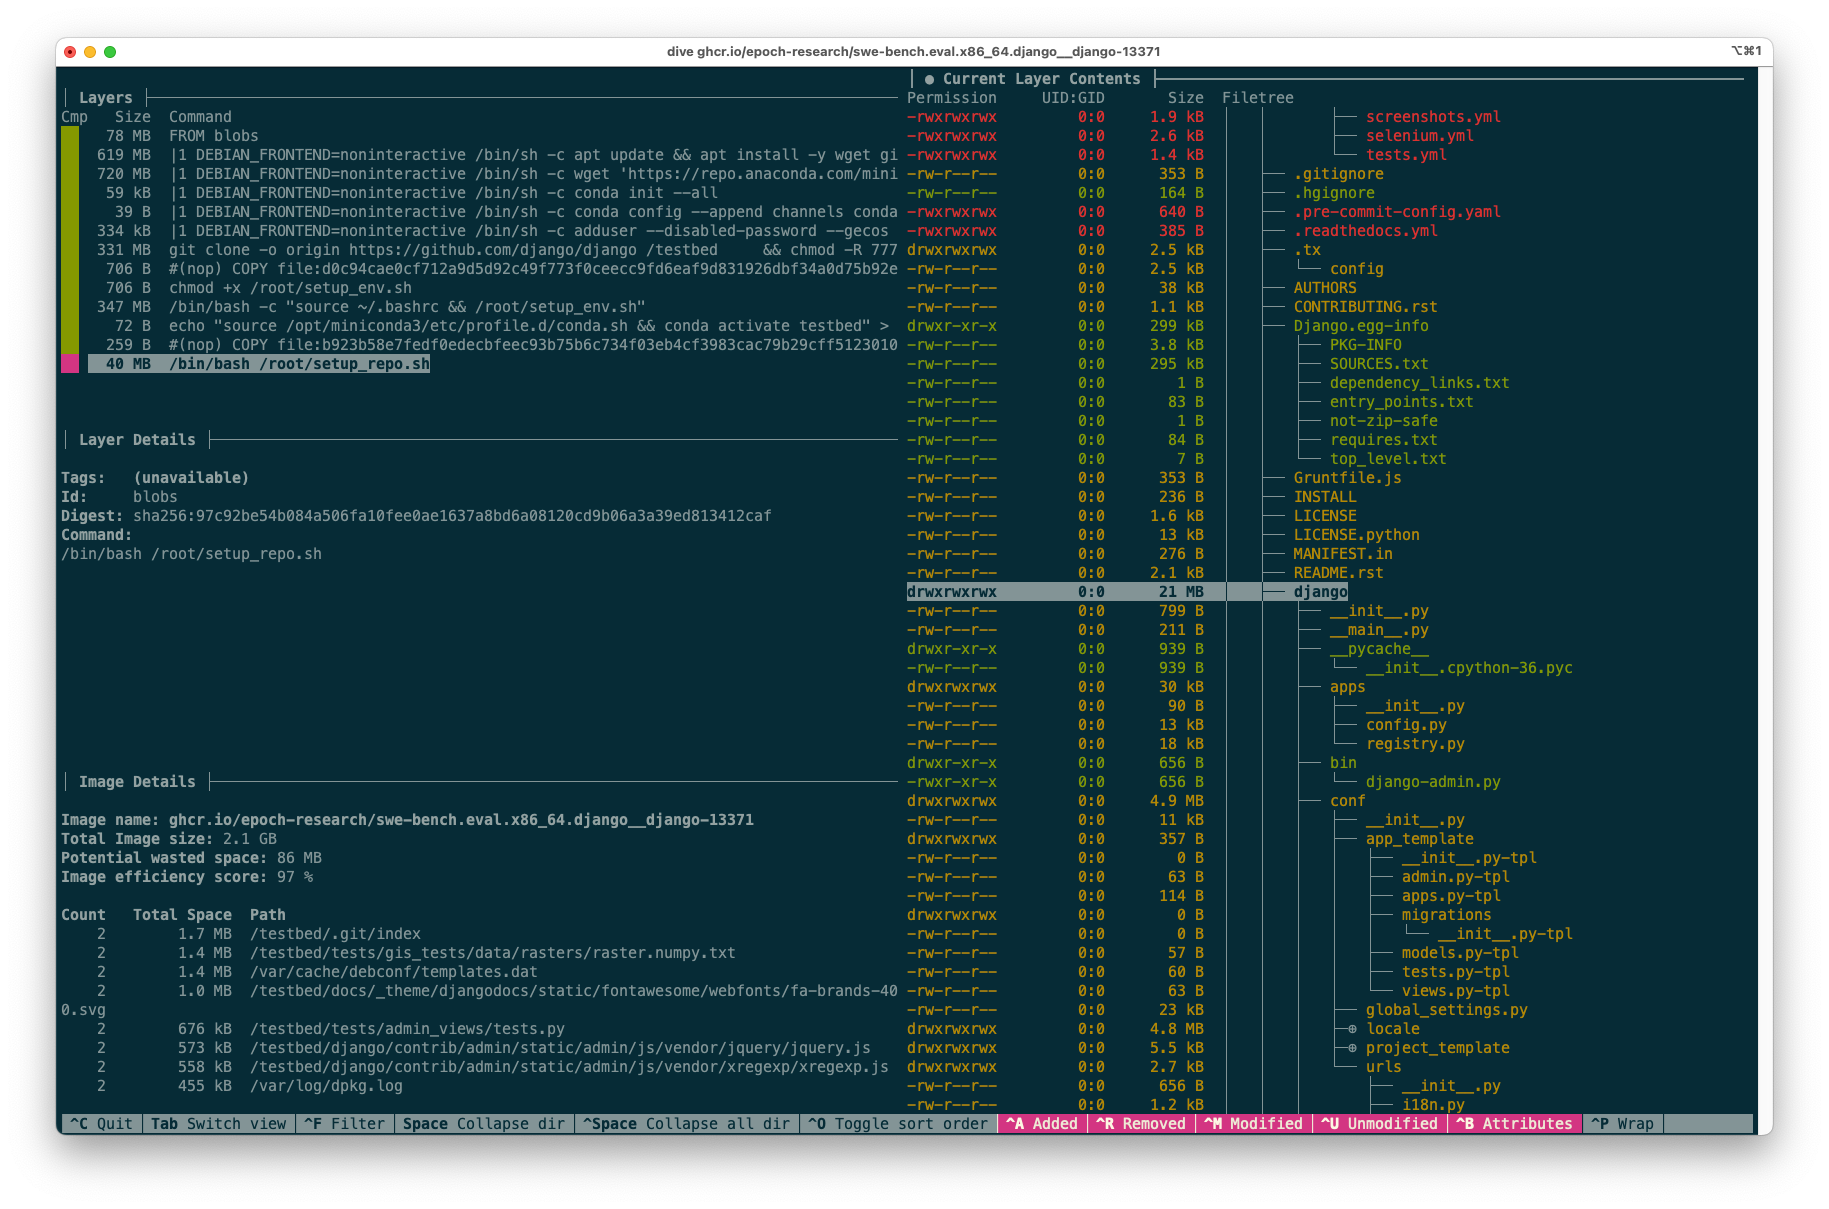
The optimized final layer reduced from 330MB to 40MB after moving the git clone operation to the env stage.
The diff between the two codebases, which represents the size of this layer, could no doubt be optimized much further. In this example the diff is the same size as the whole codebase (excluding the git history), because we are using a very naive approach: just cloning the latest version at the env stage. Instead, we could check out the appropriate revision that should be closer to the revision at the instance stage. However, for this project I kept the changes as simple as possible, in order to more easily be confident that the optimized instance images are still identical to the original ones.
Should the git history be included?
For this project I focused on pure size optimisations, because the images in the public registry should be identical to those that would be generated by the original build scripts from the SWE-bench authors. However, as a side note, it’s worth asking whether the git history should be included at all. It makes sense for the model to have access to the past git history, like a human developer would. However, the model should not have access to future history from after the PR was merged. A sophisticated cheating model could in theory reward hack the evaluation if there is any way to access future history. I believe that is possible in some circumstances even after a git reset --hard and git remote remove origin. For example, if version tags are used, the model could git checkout <tag> a future tag. Or it could access the dangling commits in some way, perhaps with git fsck --lost-found. I believe this is unlikely to be a problem currently, but could become one with future models.
The matplotlib 1.9 GB top layer
The next thing I noticed is that many matplotlib images were among the largest, often weighing in at 9GB. If we look at instance matplotlib__matplotlib-23913, we can see that setup_repo.sh is as follows:
# setup_repo.sh for matplotlib__matplotlib-23913
set -euxo pipefail
git clone -o origin https://github.com/matplotlib/matplotlib /testbed
chmod -R 777 /testbed
cd /testbed
git reset --hard 5c4595267ccd3daf78f5fd05693b7ecbcd575c1e
git remote remove origin
source /opt/miniconda3/bin/activate
conda activate testbed
echo "Current environment: $CONDA_DEFAULT_ENV"
apt-get -y update && apt-get -y upgrade && DEBIAN_FRONTEND=noninteractive apt-get install -y imagemagick ffmpeg texlive texlive-latex-extra texlive-fonts-recommended texlive-xetex texlive-luatex cm-super dvipng
python -m pip install -e .
The penultimate line installs a large number of heavy apt dependencies. This contributes to making the last layer 1,900 MB in size!
Should these commands be at the instance stage? They are taken from the pre_install key in a config dictionary that looks like this:
# swebench/harness/constants.py

# ...
SPECS_MATPLOTLIB.update(
    {
        k: {
            "python": "3.8",
            "packages": "requirements.txt",
            "install": "python -m pip install -e .",
            "pre_install": [
                "apt-get -y update && apt-get -y upgrade && DEBIAN_FRONTEND=noninteractive apt-get install -y imagemagick ffmpeg libfreetype6-dev pkg-config texlive texlive-latex-extra texlive-fonts-recommended texlive-xetex texlive-luatex cm-super"
            ],
            "pip_packages": ["pytest", "ipython"],
            "test_cmd": TEST_PYTEST,
        }
        for k in ["3.1", "3.2", "3.3", "3.4"]
    }
)

SPECS_MATPLOTLIB.update(
    {
        k: {
            "python": "3.5",
            "install": "python setup.py build; python setup.py install",
            "pre_install": [
                "apt-get -y update && apt-get -y upgrade && apt-get install -y imagemagick ffmpeg"
            ],
            "pip_packages": ["pytest"],
            "execute_test_as_nonroot": True,
            "test_cmd": TEST_PYTEST,
        }
        for k in ["2.0", "2.1", "2.2", "1.0", "1.1", "1.2", "1.3", "1.4", "1.5"]
    }
)
The pre_install command only depends on the version k of matplotlib, not on the specific instance. Therefore, it makes sense to move this command to a deeper layer, i.e. to the env image. Doing so reduces the size of the topmost layer from 1,900 MB to 110MB, a 17x reduction.
Disabling the pip cache (or how to go insane)
A much simpler optimisation is to disable the pip cache. It’s standard practice in Dockerfiles to pass --no-cache-dir to pip, so that the pip cache is not stored in the image. I only bring this one up because it led me to an interesting rabbit hole.
There are pip commands in a number of places in the setup scripts. To keep diffs simple, I thought: better to use the PIP_NO_CACHE_DIR environment variable, rather than adding the --no-cache-dir flag to every pip command. This very reasonable idea was about to lose me a day of my life.
I set PIP_NO_CACHE_DIR=1 and tested it on a few images, and it worked as expected. However, when I wanted to rebuild all the images, I discovered that some would no longer build, with a mysterious traceback looking something like this:
Traceback (most recent call last):
  File "/local/lib/python3.5/site-packages/pip/_internal/basecommand.py", line 78, in _build_session
    if options.cache_dir else None
  File "/lib/python3.5/posixpath.py", line 89, in join
    genericpath._check_arg_types('join', a, *p)
  File "/lib/python3.5/genericpath.py", line 143, in _check_arg_types
    (funcname, s.__class__.__name__)) from None
TypeError: join() argument must be str or bytes, not 'int'
I was baffled that the behaviour of pip could change between instances, because pip is one of the first things installed in the base image that all others inherit from:
RUN apt update && apt install -y \
...
python3 \
python3-pip
The traceback did lead me to this ancient GitHub issue from 2018. The issue was fixed in this PR, which was merged into pip 19 and later.
However, my base image used a much more recent version of pip.
After much despair and gnashing of teeth, I eventually discovered that the images use Anaconda at the env stage like this:
# swebench/harness/test_spec.py
cmd = f"conda create -n {env_name} python={specs['python']} -y"
Anaconda installs different versions of pip depending on the Python version. The oldest issues in the SWE-bench dataset are very old. They use ancient versions of Python, and hence of pip. For example, Django 5470 is from 2015, and the corresponding image uses Python 3.5 and pip 10.
So, if PIP_NO_CACHE_DIR=1 crashes pip on pip < 19, how were we supposed to disable the cache? As I found out by GitHub comments from 2016, by setting PIP_NO_CACHE_DIR=0!

GitHub comment from 2016 expressing surprise that one needs to set PIP_NO_CACHE_DIR=0 to disable the pip cache.
The aforementioned PR (merged into pip 19) fixes the crash, and causes PIP_NO_CACHE_DIR=1 to disable the cache as expected. However, backward compatibility was preserved with the “well-known” behaviour that PIP_NO_CACHE_DIR=0 disables the cache.

GitHub comment from 2018 discussing backward compatibility.
In summary, I was able to disable the cache for all instances by setting PIP_NO_CACHE_DIR=0. Of course, all modern documentation on pip instructs you to set PIP_NO_CACHE_DIR=1 to disable the cache, and doesn’t mention this behaviour. So I had set up a devilishly confusing Dockerfile. I wrote a long code comment explaining the issue, and vowed to never do this again.
Impact on size
The 2294 SWE-bench docker images are sometimes reported to be around 2,000 GB in size. For example, the Princeton/OpenAI team wrote that
By default, the harness
cache_levelis set toenv, which means that the harness will store the base and environment images, but not the instance images.In this setting, the base and environment images will be reused across runs, but take up about 100GB of disk space. At the time of release, we require about 120GB of free disk space to run the harness with any
cache_level. [Note by TA: they mean anycache_levelother thaninstance]For users who want the fastest possible evaluation times, we recommend setting
cache_leveltoinstance. In this setting, the harness will store images for all instances […] However, all base, environment, and instance images will be stored, taking up about 2,000GB of disk space.
The 120GB number (for a cache level other than instance) has been widely reported by evals professionals, for example:
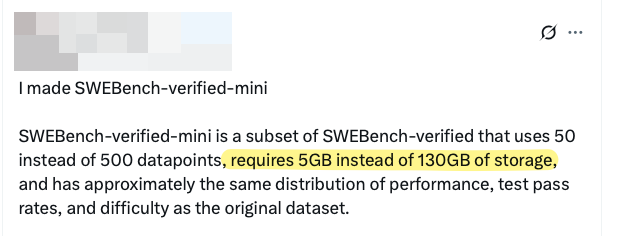
Screenshot showing reported disk space requirements for SWE-bench evaluations.
Similarly, the All Hands team wrote that
because each agent runs in its own environment, it is necessary to create many environments, which requires hundreds of gigabytes of space
I’m not sure where the 2,000 GB number comes from. When summing the individual sizes of all (original) SWE-bench images, I get 3129 GiB. However, this ignores that many of these images share the same layers! When Docker builds or pulls these images, shared layers are only stored once.
When correctly calculated by summing only the sizes of the unique layers, the size of the unoptimized SWE-bench images comes to 684 GiB, which is nowhere near 2,000 GB. For SWE-bench Verified, the true size of the original images is 189 GiB. (You can reproduce my calculation using the script get_registry_size.py, and my data is also shared in the repository.)
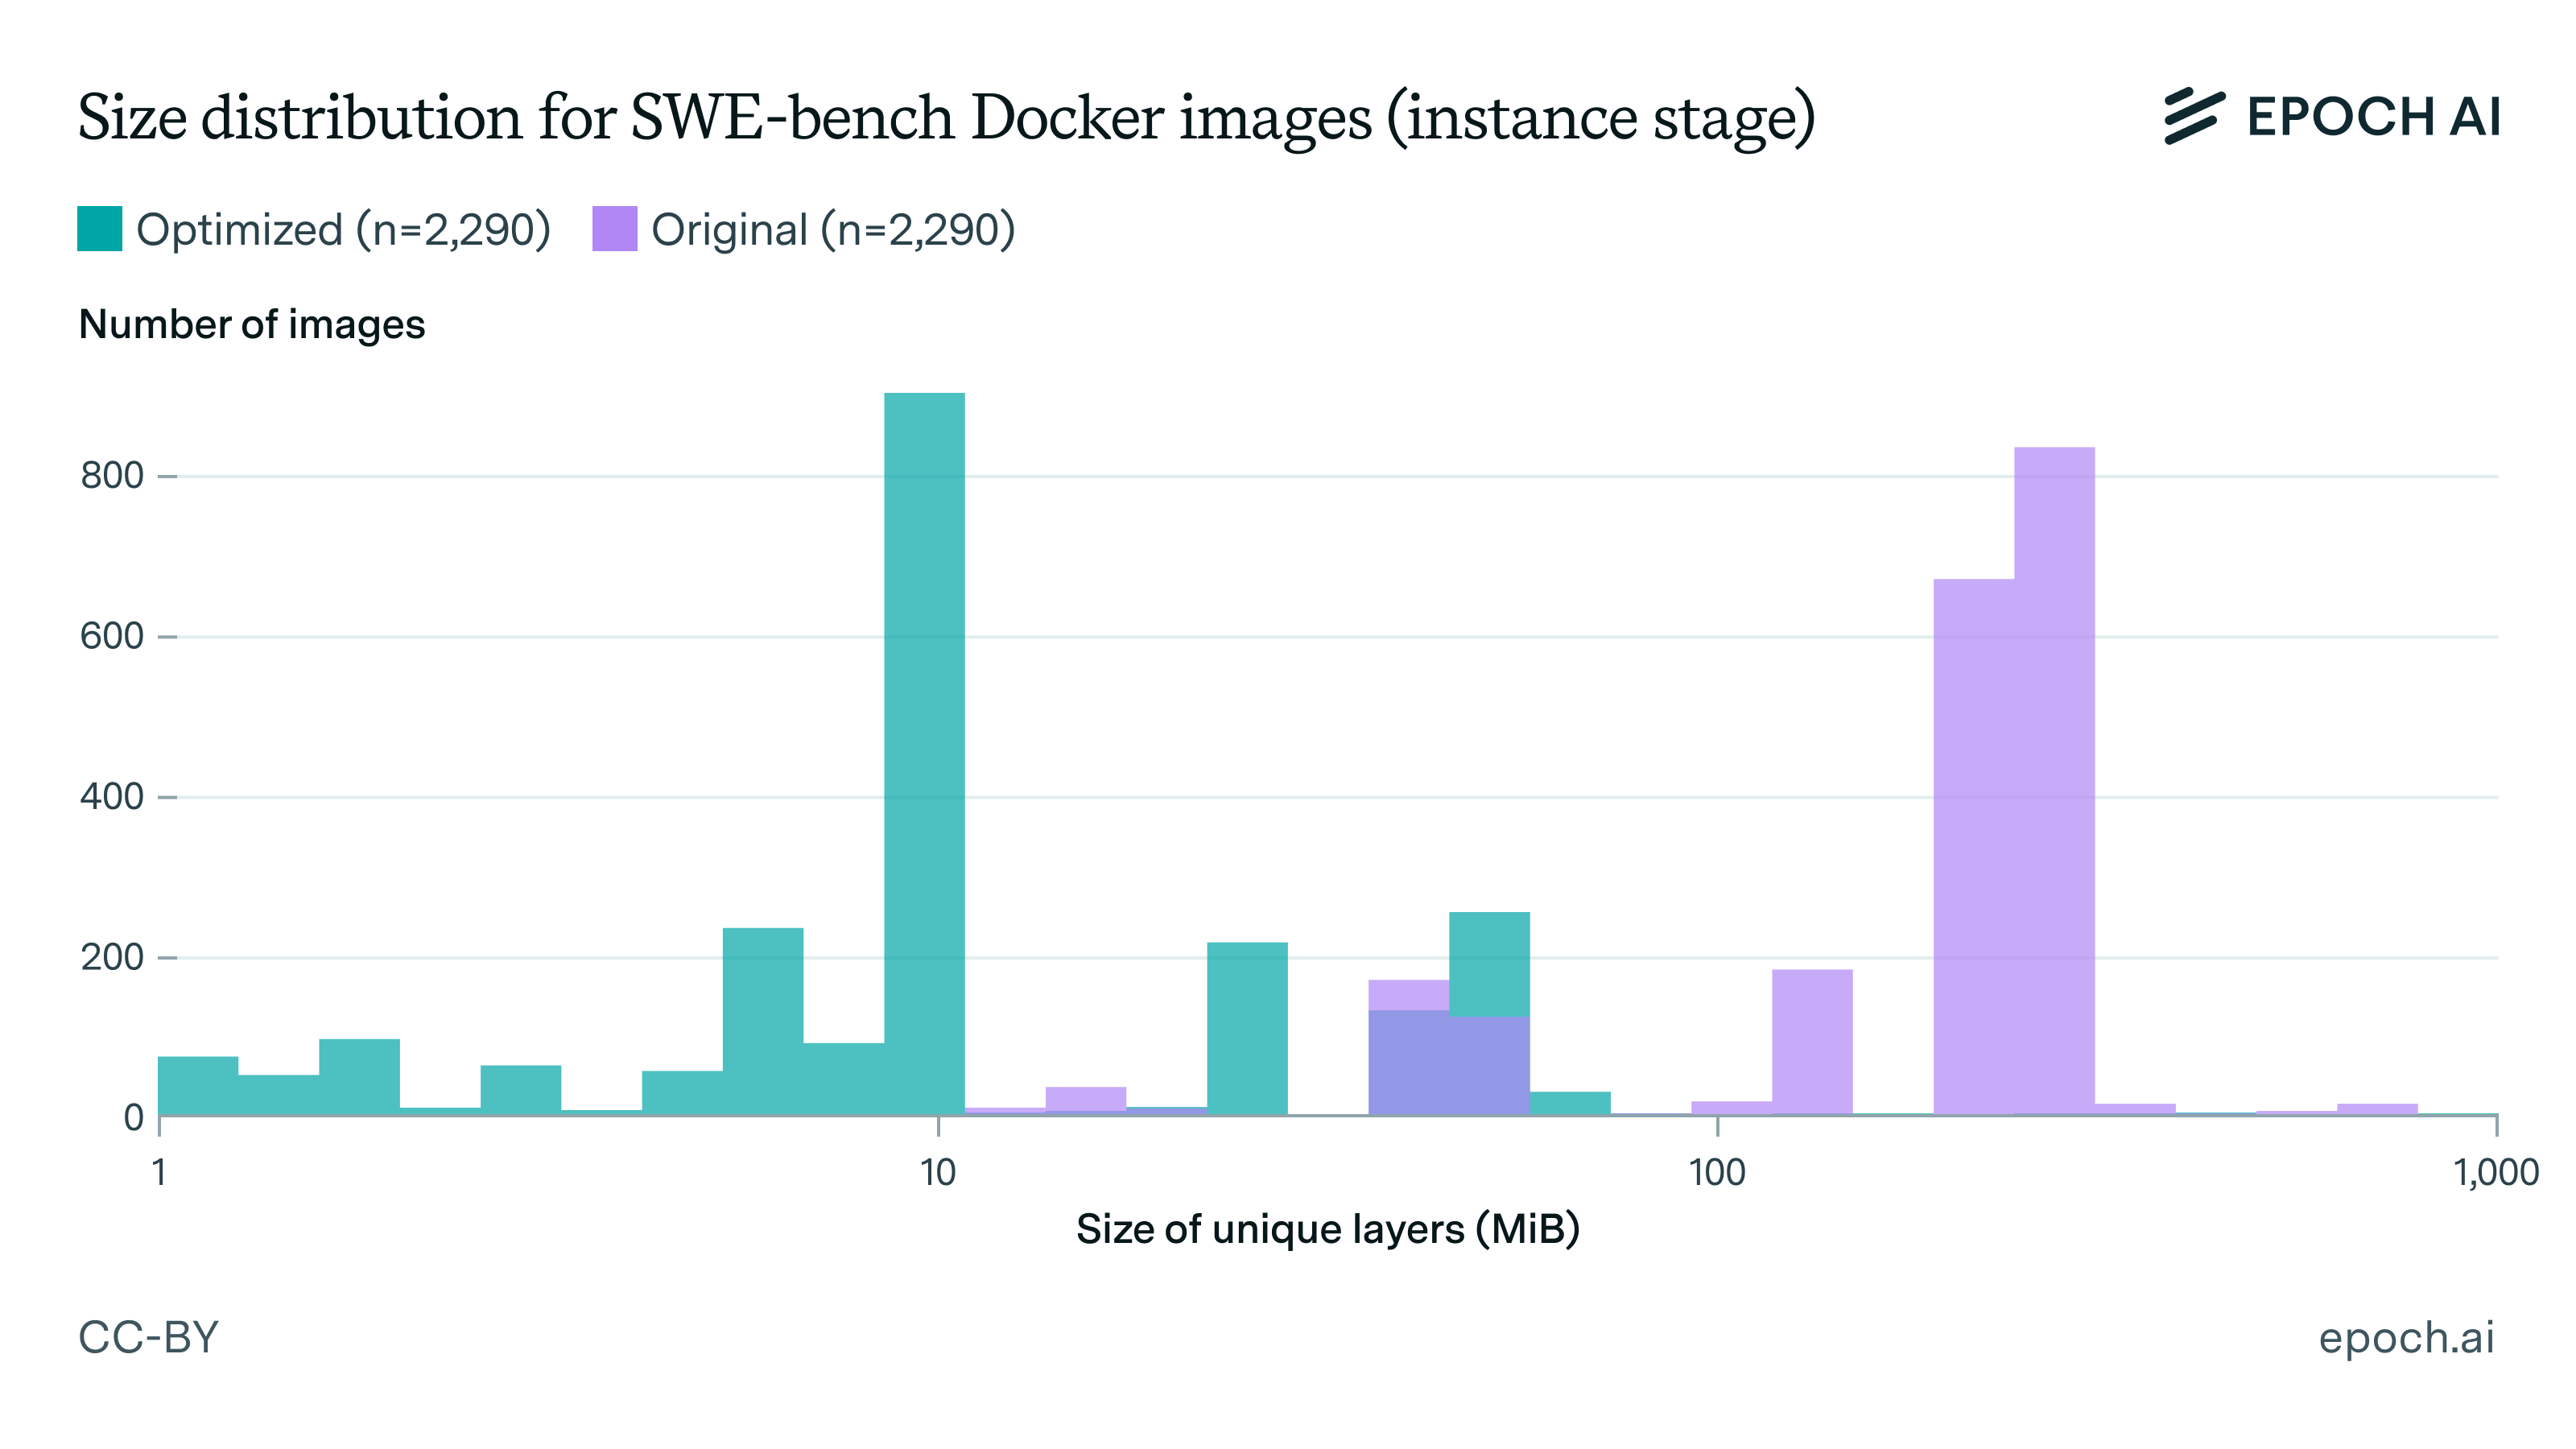
After all my optimisations, the total size of the SWE-bench images is 67 GiB (10x reduction) while the SWE-bench Verified set fits in 30 GiB (6x reduction).
| SWE-bench (2290) | SWE-bench Verified (500) | |
|---|---|---|
| Optimised (ours) | 67 GiB | 30 GiB |
| Original | 684 GiB | 189 GiB |
| Original, reported by SWE-bench authors | 1,800 GiB (2,000 GB) | N/A |
Running SWE-bench Verified in about an hour
Using our image registry, we’re able to run SWE-bench Verified in 62 to 73 minutes for many major models. Specifically, we ran the benchmark on a single GitHub actions runner with 32 cores and 128GB of RAM. We gave models a limit of 300,000 tokens per sample for the whole conversation (i.e. summing input and output tokens for every request in the conversation)4. Here were the runtimes for three major models:
gemini-2.0-flash-001: 62 minutesgpt-4o-2024-11-20: 70 minutesclaude-3-7-sonnet-20250219: 63 minutes
As we have discussed above, OpenHands reported evaluation times of 10 minutes per sample on one machine, which they were able to reduce to about 20 seconds per sample by using 32 machines in parallel.
Using our optimized image registry, we achieve speeds of about 8 seconds per sample on a single large machine. This is 77x faster than OpenHands, and still 2.4 times faster than what OpenHands achieved with 32 machines. The comparison isn’t strictly a fair one; while OpenHands didn’t share details of their hardware, they were likely using less powerful machines.
Note that we have high API rate limits on these models, which are necessary to replicate these runtimes. Each eval used 100-150M tokens (of which the majority cached tokens), so we are using roughly 2M tokens per minute during the evaluation.
How to use our image registry
Our image registry is public, MIT-licensed, and hosted on GitHub Container Registry. Each image can be accessed by its name, and we follow the same naming pattern as the original SWE-bench authors. At the moment, all images only have the tag latest.
The naming format is ghcr.io/epoch-research/swe-bench.eval.<arch>.<instance_id>, for example ghcr.io/epoch-research/swe-bench.eval.x86_64.astropy__astropy-13236.
For x86_64, we’re able to build 2290/2294 (99.8%) of the images, and all 500/500 out of the SWE-bench Verified set.
For arm64, 1819 (out of 2294) images are provided on a best-effort basis, and have not been tested.
Come be my boss?
In the last 9 months, I’ve set up Epoch AI’s evals capability from scratch as the sole engineer. The open data on our Benchmarking Hub is already being used by policymakers and researchers, and we’re usually among the top 3 results on Google for “AI benchmarks”. But our goals are far more ambitious. We’re hiring for an engineer with leadership experience to spearhead our benchmarking efforts and be my new manager.
If you think you might be a fit, please apply! We also have a $5,000 bonus if you refer someone who gets hired.
We pay $200,000 - $300,000 / year, and we’re fully remote. Here’s the job description. You can also email me if you have any questions about the role.
-
Note the potentially confusing metaphor: an image is built by adding layers from bottom to top, so higher layers come later in the Dockerfile, while lower (deeper) layers come earlier in the Dockerfile.

-
This example isn’t cherry-picked, I chose it at random towards the middle of the Django dataset, when sorted by issue number. (The issue numbers range from around 5000 to around 17,000, and the vast majority are in the 10,000 to 17,000 range.)
-
As the docs explain, the purpose of a multi-stage build is to selectively copy artifacts from one stage to another:
With multi-stage builds, you use multiple
FROMstatements in your Dockerfile. EachFROMinstruction can use a different base, and each of them begins a new stage of the build. You can selectively copy artifacts from one stage to another, leaving behind everything you don’t want in the final image.In a multi-stage build, we selectively copy artifacts to make the final stage smaller and more cacheable. In SWE-bench, the stages just build on top of one another without any selective copying. From the point of view of caching and of the final images being produced, it is just as if we put all the instructions in one Dockerfile. The purpose of the three stages from the SWE-bench authors is likely to make the large number of generated Dockerfiles more manageable, and to be able to selectively prune just the
instancestages while running the benchmark on a machine with limited disk space. -
The SWE-bench Verified evaluations on our Benchmarking Hub currently set this maximum to 1 million tokens. We also don’t run the eval directly on the images as they are in the registry, but add a few very lightweight layers containing the SWE-Agent tools that we use for our evaluations. For most models, the runtime in production is very similar to the numbers in this blog post; for some reasoning models that create a lot of output, with 1 million tokens we are bottlenecked by API rate limits. For more details on our evaluation setup, see the Benchmarking Hub.
About the authors
Related work